Tool: Check CBS Corruption

I hacked together a small tool in .NET that helps me quickly analyze the Component Based Servicing (CBS) log in c:\windows\logs\cbs\cbs.log for missing CSI Payloads.

It will parse the log file selected and extract the packages. A few options are available to then search for the missing payloads by specifying a source directory (like a known good copy of \windows\winsxs folder.

This GUI is a culmination of a few PowerShell scripts I hacked together to basically do the same thing. The only thing I do not have in the GUI is the ability to convert the UBR to a KB, so for example if a missing package for Windows Server 2019 is amd64_microsoft-windows-f..rcluster-clientcore_31bf3856ad364e35_10.0.17763.3469_none_decef48d0a3310cc, the UBR is 3469 and that is found in KB5017379 which can be determined by visiting Microsoft’s Windows Server release information.

I did write a PowerShell script that retrieves the Windows Server release information, if anyone is interested. It takes an argument (win10, win11, server2019, server2022) and defaults to server2019 if no argument provided.

The PowerShell version of this is available in my GitHub repo.

Check CBS Corruption

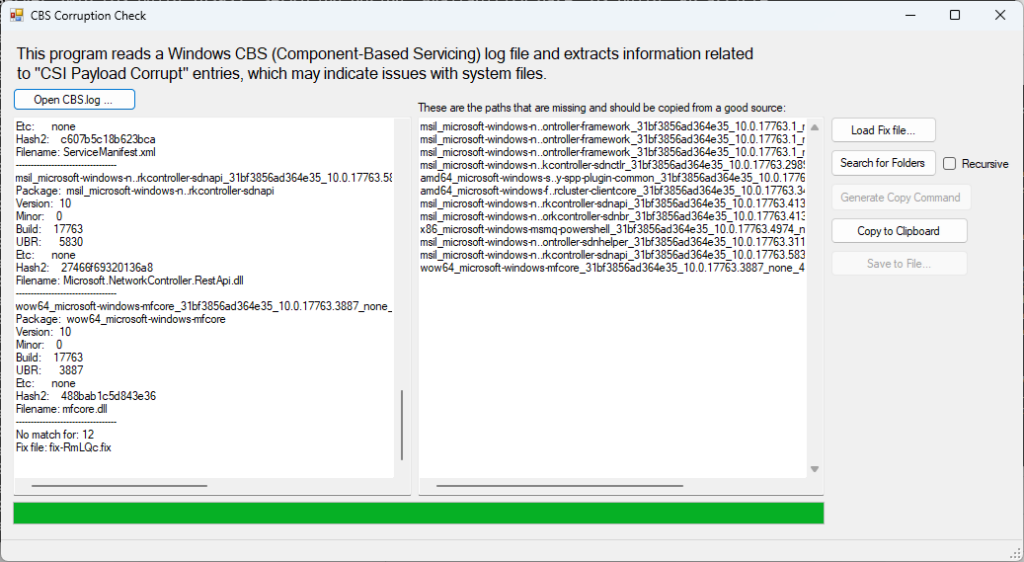
This is the main interface. After selecting the CBS log file, it will parse it and display any lines with CSI Payload Missing. It writes a .fix file and displays the contents on the right pane. These are the missing folders.

From there, a few options I needed was to copy to clipboard, and also generate copy command. The generate copy command just utilizes robocopy and hardcodes a fake destination that will need changed. Alternatively, you can use the Search for Folders button and choose a source folder to search. By default it will start in c:\windows\winsxs. If you want to use recursion, be sure to check the recursive checkbox.

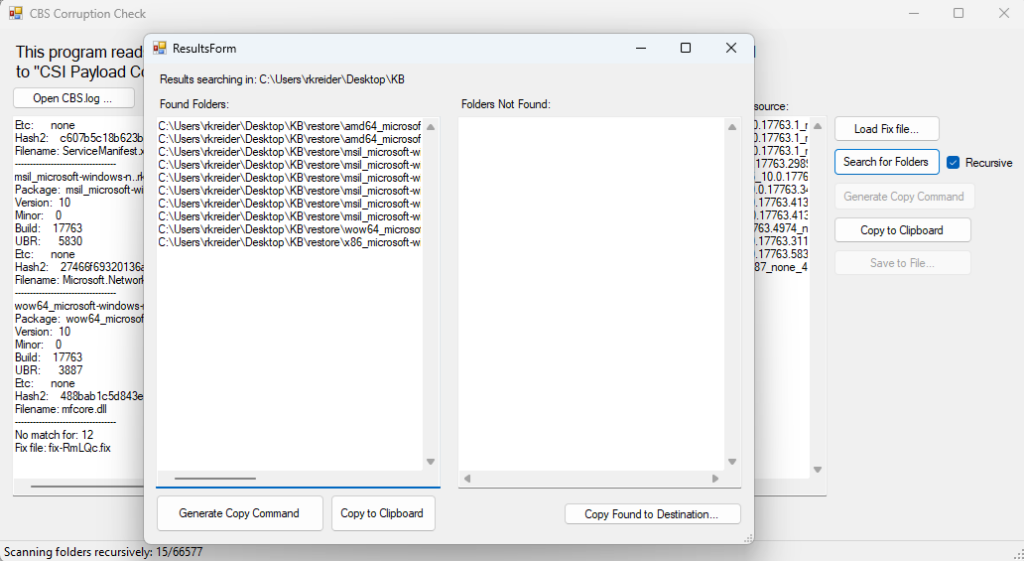
This is the results of the Search for Folders button. If it finds files, the left pane lists the location where the folders are. You can then use the Copy Found to destination button which lets you choose a destination folder and will then copy the found folders entirely to the destination. Alternatively a couple options exist to Copy to Clipboard and Generate Copy Command (which generates a robocopy command like previous).

Tail a file in Windows

This PowerShell one-liner is a convenient way to monitor log files in real-time and quickly spot error messages. The script continuously reads the log and highlights lines that contain the word “error” with a red background, making them easy to identify. It’s a handy tool for troubleshooting or monitoring system activities, especially when dealing with logs generated by tools like DISM.

gc .\dism.log -wait |foreach-object { if ($_ -match "error"){write-host -foregroundcolor white -BackgroundColor red $_} else {write-host $_}}

Explanation:

  1. gc .\dism.log -wait
    • gc is short for Get-Content, a PowerShell cmdlet that reads the content of a file.
    • .\dism.log specifies the file to read, which is dism.log. This log file is typically generated by the Deployment Imaging Service and Management Tool (DISM), often used for Windows image management.
    • The -wait parameter makes Get-Content continuously monitor the log file in real-time, displaying new content as it is written to the file. This is especially useful for live monitoring of logs.
  2. | foreach-object
    • The | symbol (pipeline) sends the output of the Get-Content cmdlet to the next part of the command.
    • foreach-object is a loop that processes each line of the log file one by one as it is being read.
  3. if ($_ -match "error")
    • $_ represents the current line of the log file being processed in the loop.
    • -match "error" checks if the current line contains the word “error” (case-insensitive by default in PowerShell). This is the key part that identifies lines with errors in the log.
  4. write-host -foregroundcolor white -BackgroundColor red $_
    • If the line contains the word “error,” this part of the command prints it to the console with a white foreground (text color) and a red background for visibility, signaling an error.
    • $_ again represents the line being processed.
  5. else { write-host $_ }
    • If the line doesn’t contain “error,” it simply prints the line normally, without any special formatting.

Example:

Suppose you are monitoring the dism.log file and a line like this is written to the log:

2024-10-11 14:55:12, Error DISM DISM.EXE: Failed to load the provider

In the console, this line will be printed in white text with a red background, making it easy to spot among other log entries.

Photoshop Mix

Photoshop Mix was sunset by Adobe in June 2024. This was one of the simplest mobile apps for iOS and Android that had been out since around 2016 and I heavily used it to make memes and quick edits for people in Photoshop Facebook groups. The simplicity of the layers, cutouts with shapes, and its interface was ahead of its time and to date I have not found a mobile app that can replace it, free or paid.

After June, many people took to Reddit to voice complaints that the app no longer works and thereby they cannot access all their projects anymore. I discovered that you can actually still access your projects, just not in an editable way — you can only download the “compositions”. You can download the compositions by visiting https://assets.adobe.com/mobilecreations.

Because this app is one of my favorites, I have had some thoughts on trying to get it to work, or figure out how to bypass the login screen that now errors indicating the product is no longer supported. My work so far in testing / troubleshooting has lead me to a token that seems to be the culprit. It might be possible that I can forge this token through some proxy or something to rewrite it, but that would mean I need to be on a network I can handle proxying and this wouldn’t work on a mobile network.

The error when launching Photoshop Mix now:

We couldn’t sign you in. Either the product you are trying to use is no longer supported or the client ID is not valid.

I’ll update this post with more details as I get them organized, but here’s what I have so far.

The client_id of OrionPS1 seems to be what is triggering the invalid application. In testing on my phone with Adobe Photoshop Express, I see that application uses the client_id of PSXIOS3.

This will generate the error above.

curl 'https://ims-na1.adobelogin.com/ims/authorize/v1?redirect_uri=signin%3A%2F%2Fcomplete&client_id=OrionPS1' \
-H 'Host: ims-na1.adobelogin.com' \
-H 'Sec-Fetch-Site: none' \
-H 'Connection: keep-alive' \
-H 'Sec-Fetch-Mode: navigate' \
-H 'Accept: text/html,application/xhtml+xml,application/xml;q=0.9,\*/\*;q=0.8' \
-H 'User-Agent: Mozilla/5.0 (iPhone; CPU iPhone OS 18_0 like Mac OS X) AppleWebKit/605.1.15 (KHTML, like Gecko) Mobile/15E148' \
-H 'Accept-Language: en-US,en;q=0.9' \
-H 'Sec-Fetch-Dest: document'

Now, looking at the Adobe Photoshop Express app HTTP requests, this is what things look like.

GET /ims/authorize/v3?client_id=PSXIOS3&scope=creative_sdk,AdobeID,openid,sao.cce_private,additional_info.projectedProductContext,sao.spark,tk_platform,tk_platform_sync,af_byof,af_ltd_psx,tk_platform_grant_free_subscription,firefly_api&force_marketing_permission=true&locale=en-US&idp_flow=login&response_type=device&device_name=iPhone&hashed_device_id=[redacted]&state=%7B%22ac%22:%22psxios%22%7D&redirect_uri=com.adobe.psmobile://login.complete HTTP/1.1  
Host: ims-na1.adobelogin.com  
Sec-Fetch-Dest: document  
User-Agent: Mozilla/5.0 (iPhone; CPU iPhone OS 18_0 like Mac OS X) AppleWebKit/605.1.15 (KHTML, like Gecko) Version/18.0 Mobile/15E148 Safari/604.1  
Accept: text/html,application/xhtml+xml,application/xml;q=0.9,/;q=0.8  
Sec-Fetch-Site: none  
Sec-Fetch-Mode: navigate  
Accept-Language: en-US,en;q=0.9  
Priority: u=0, i  
Accept-Encoding: gzip, deflate, br  
Connection: keep-alive

What I note is that the URI path is changed from /ims/authorize/v1 to /ims/authorize/v3. So if I change my cUrl command to the following, I get a new error.

curl 'https://ims-na1.adobelogin.com/ims/authorize/v3?redirect_uri=signin%3A%2F%2Fcomplete&client_id=PSXIOS3&scope=creative_sdk,AdobeID,sao.cce_private&idp_flow=login&force_marketing_permission=true&response_type=device&device_id=[redacted]&device_name=iPhone&locale=en-US&state=%7B%22ac%22:%22PSMix_app%22%7D&grant_type=device&hashed_device_id=[redacted]' \
-H 'Host: ims-na1.adobelogin.com' \
-H 'Sec-Fetch-Site: none' \
-H 'Connection: keep-alive' \
-H 'Sec-Fetch-Mode: navigate' \
-H 'Accept: text/html,application/xhtml+xml,application/xml;q=0.9,\*/\*;q=0.8' \
-H 'User-Agent: Mozilla/5.0 (iPhone; CPU iPhone OS 18_0 like Mac OS X) AppleWebKit/605.1.15 (KHTML, like Gecko) Mobile/15E148' \
-H 'Accept-Language: en-US,en;q=0.9' \
-H 'Sec-Fetch-Dest: document'

bad_request

missing hashed_device_id parameter

So adding that in based on what my hashed_device_id paramater is, I do not get a response back. This is as far as I’ve gotten with the 15 minutes I’ve had to work on it. I’ll explore it more later.

Migrating to Hugo from WordPress

I’ve migrated this site from WordPress to Hugo. Here’s some notes on it.

First, it takes less than 30 seconds to build the site and also for Pagefind to index for the search functionality.

site@kreinix:~/techish# time ./build.sh
Start building sites …
hugo v0.129.0-e85be29867d71e09ce48d293ad9d1f715bc09bb9+extended linux/amd64 BuildDate=2024-07-17T13:29:16Z VendorInfo=gohugoio


                   | EN-US
-------------------+--------
  Pages            |  1035
  Paginator pages  |     0
  Non-page files   |     0
  Static files     | 12458
  Processed images |     0
  Aliases          |     1
  Cleaned          |     0

Total in 18692 ms

Running Pagefind v1.1.0
Running from: "/site/techish"
Source:       "/var/www/html"
Output:       "/var/www/html/pagefind"

[Walking source directory]
Found 906 files matching **/*.{html}

[Parsing files]
Did not find a data-pagefind-body element on the site.
↳ Indexing all <body> elements on the site.

[Reading languages]
Discovered 2 languages: en-us, unknown

[Building search indexes]
Total:
  Indexed 1 language
  Indexed 904 pages
  Indexed 18763 words
  Indexed 0 filters
  Indexed 0 sorts

Finished in 2.681 seconds

real    0m21.474s
user    0m7.717s
sys     0m5.473s

Ok, pretty cool.

To get here, there were a handful of things I did.

  • Convert WordPress MySQL to SQLite3 database file (done long ago)
  • Write Python3 script to convert SQLite3 database file to HTML files to process as Markdown

I have the Python3 script in a repo on my github.

What’s really cool is that I went from about 500KB for data request to less than 100KB now serving static files and cleaning up and not using a lot of the bloat from a PHP / WordPress combination.

Problems

Me being pure lazy right now, I will fix the links across all the posts soon. Some things I’ve had to use a hammer on to get working right away. One thing being that I used to use links such as /category/post/ permalink. The python I wrote didn’t take the category from the post and put it in a category folder. Here’s a real crappy hammer approach to getting nginx to work around this issue and redirect /category/post/ to /post/.

location ~* ^/(?!posts/|search/|pagefind/|icons/|js/|fonts/|categories/|tags/)[^/]+/[^/]+/?$ {
    if (-f $request_filename) {
        break;
    }
    rewrite ^/[^/]+/(.+)$ /$1 redirect;
}
location /posts/ {
    try_files $uri $uri/ =404;
}
location / {
    try_files $uri $uri/ =404;
}

Shortcodes

I used a plugin on my WordPress blog that took table data from a shortcode plugin and converted it to a <table></table> nicely. It was convenient because I could create tabled data quickly using a structure such as:

columnA columnB
row1A row1B
row2A row2B

Among that, I’m certain in the past I used other plugins that used shortcodes. I need to parse the files now to fix this. Eventually I need to implement this in the SQL to Mardown portion to avoid any after-conversion processing.

Titles

Seems the wp2hugopy code (github) that extracts posts doesn’t handle html entities in the title of the post so I’ll need to add a unit test for that case for the wp2hugopy project. For now, I’ll write something up to specifically find frontmatter with title: that is not quoted and quote it with whatever HTML entities are in it. That also means I need to slugify the markdown filename manually. An update to my wp2hugopy code should handle that automatically when there’s a fresh extraction in the future.

Find zip files and unzip into directory based on zip file name in linux

This command is a neat way to automate extracting multiple zip files into directories named after the files themselves. It avoids the need to unzip files manually one by one, which is particularly useful in large directories or complex file structures.

find . -iname '*.zip' -exec sh -c 'unzip "{}" -d "${1%.*}"' _ {} \;

Explanation:

  1. find .
    • The find command searches through directories recursively, starting from the current directory (.). It looks for files that match specific criteria.
  2. -iname '*.zip'
    • This option tells find to look for files with names ending in .zip. The -iname flag makes the search case-insensitive, meaning it will match .zip, .ZIP, or any other case combination.
  3. -exec
    • The -exec option allows you to run a command on each file that find locates. In this case, it runs a shell script to unzip the files.
  4. sh -c 'unzip "{}" -d "${1%.*}"' _ {}
    • sh -c runs the specified shell command. Here’s what this part does:
      • 'unzip "{}" -d "${1%.*}"': This is the actual unzipping command. unzip extracts the contents of the zip file ("{}" refers to the zip file found by find).
      • -d "${1%.*}": This specifies the target directory where the file should be extracted. The syntax ${1%.*} removes the .zip extension from the filename to use the base name of the zip file as the folder name. For example, if the zip file is example.zip, it will create a folder example to extract the contents into.
      • The first underscore (_) is a placeholder used by sh -c to refer to the next argument ({}), which is the zip file path that find passes to the command.
  5. {} \;
    • {} represents each file found by find, and \; terminates the -exec command.

Example:

Suppose you have the following structure:

/home/user
├── folder1
│ └── file1.zip
├── folder2
│ └── file2.ZIP

Running the command will:

  • Find file1.zip and file2.ZIP.
  • Extract the contents of file1.zip into a folder named file1 and file2.ZIP into a folder named file2.