Performance tuning iSCSI Round Robin policies in ESXi for Nimble storage

Here’s an ESXi console script to loop through each Nimble eui.* adapter and set IOPS=0 and BYTES=0 (per Nimble recommendations).

for x in `esxcli storage nmp device list | awk '/Nimble iSCSI Disk/{print $7}' | sed -e 's/(//' -e 's/)//'`; do
echo $x
esxcli storage nmp psp roundrobin deviceconfig set -d $x -t bytes -B 0;
esxcli storage nmp psp roundrobin deviceconfig set -d $x -t iops -I 0 ;
esxcli storage nmp psp roundrobin deviceconfig get -d $x;
done

Note: If you change the order above and set bytes after iops, then the policy will be based on bytes and not IOPS.
To reset defaults, use the following script on the ESXi host console:

for x in `esxcli storage nmp device list | awk '/Nimble iSCSI Disk/{print $7}' | sed -e 's/(//' -e 's/)//'`; do
echo $x
esxcli storage nmp psp roundrobin deviceconfig set -d $x -t bytes -B 10485760;
esxcli storage nmp psp roundrobin deviceconfig set -d $x -t iops -I 1000 ;
esxcli storage nmp psp roundrobin deviceconfig set -d $x -t default;
esxcli storage nmp psp roundrobin deviceconfig get -d $x;
done

To make sure this survives a reboot, you can set a policy:

esxcli storage nmp satp rule add --psp=VMW_PSP_RR --satp=VMW_SATP_ALUA --vendor=Nimble --psp-option=policy=iops;iops=0

Note that if you previously configured a user-defined SATP rule for Nimble volumes to simply use the Round Robin PSP (per the Nimble VMware best practices guide), you will first need to remove that simpler rule, before you can add the above rule, or else you will get an error message that a duplicate user-defined rule exists. The command to remove the simpler rule is: –Bill

esxcli storage nmp satp rule remove --psp=VMW_PSP_RR --satp=VMW_SATP_ALUA --vendor=Nimble

IBM System X3850 Disable Processor Power Management

In order to work around the issue processor power management has to be disabled in system UEFI and vSphere Client.
To change power policies using server UEFI settings:

  1. Turn on the server.
    Note: If necessary, connect a keyboard, monitor, and mouse to the console breakout cable and connect the console breakout cable to the compute node.
  2. When the prompt ‘Press <F1> Setup’ is displayed, press F1 and enter UEFI setup. Follow the instructions on the screen.
  3. Select System Settings –> Operating Modes and set it to ‘Custom Mode’ as shown in ‘Custom Mode’ figure, then set UEFI settings as follows:
    Choose Operating Mode <Custom>
    Memory Speed <Max Performance>
    Memory Power Management <Disabled>
    Proc Performance States <Disabled>
    C1 Enhanced Mode <Disabled>
    QPI Link Frequency <Max Performance>
    QPI Link Disable <Enable All Links>
    Turbo Mode <Enable>
    CPU C-States <Disable>
    Power/Performance Bias <Platform Controlled>
    Platform Controlled Type <Maximum Performance>
    Uncore Frequency Scaling <Disable>

  4. Press Escape key 3 times, and Save Settings.
  5. Exit Setup and restart the server so that UEFI changes take effect.

Next, change power policies using the vSphere Client:

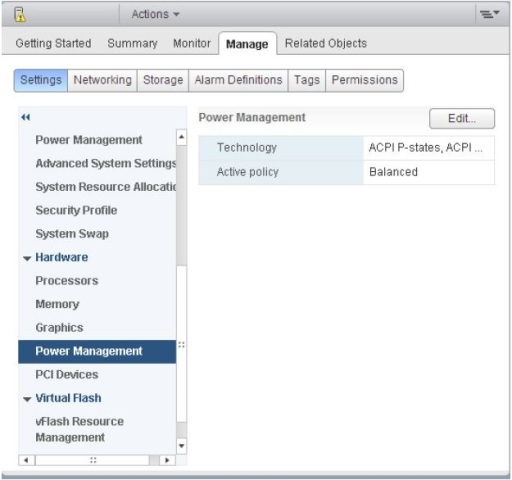
  1. Select the host from the inventory and click the Manage tab and then the Settings tab as shown in ‘Power Management view from the vSphere Web Client’ figure.
  2. In the left pane under Hardware, select Power Management.
  3. Click Edit on the right side of the screen.
  4. The Edit Power Policy Settings dialog box appears as shown in ‘Power policy settings’ figure.
  5. Choose ‘High performance’ and confirm selection by pressing ‘OK’ radio button.

CPU-miner Installed via Windows OS Vulnerability

Update 5/6/2017:  Close port 445 and apply MS 17-010
I have triaged a handful of Windows servers this week that started out being ticketed as high CPU / performance issues.
Upon investigation, I have found XMR cryptocurrency miners being installed through a Windows OS Vulnerability.
Continue reading CPU-miner Installed via Windows OS Vulnerability

VMware vSphere 6.5 Test Drive

This will be an evolving post as I document/note the installation process and some configuration and testing.
I’m installing VMware vSphere 6.5 under my current virtualization platform to give it a spin. I’m most curious about the web interface, now that it has moved exclusively in that direction. I *HOPE* it is much better than my current vSphere 5.5 U1 deployment.

9:39PM Installation

So far, installation is going well.  As a simple test setup, I created a virtual machine on my current vSphere 5.5 system with 20GB HDD, 4vCPU (1 socket, 4 core), and 4GB RAM.
The only alert I’ve received at this point is compatibility for the host CPU – probably because of nesting?

9:53PM Installation Completed

Looks like things went well, so far.  Time to reboot and check it out.

9:58PM Post Install

Sweet, at least it booted.  Time to hit the web interface.

Login screen at the web interface looks similar to 5.5.

The web console is night and day performance difference over vSphere 5.5.  I’m totally liking this!

10:30PM vFRC (vSphere Flash Read Cache)

I just realized, after 10 minutes of searching through the new interface, that I cannot configure vFRC in the webconsole of the host.  I need to do this with vCenter Server -or- through the command line.  So, off to the command line I go.
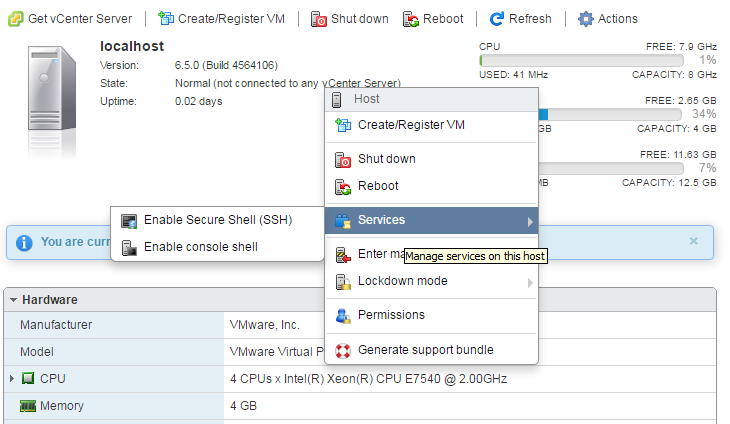
First, I enabled SSH on the host which is easy enough by right-clicking and choosing Services > Enable Secure Shell (SSH).

After SSH was enabled, I logged in.  Not knowing anything much about what commands were available, I gave it a shot with esxcli storage just to see what I could see.  I saw vflash.  Cool, haha.

Next, I dig into that with esxcli storage vflash and see what I have available.  Sweet mother, I have cache, module and device namespaces.  Ok, I went further and chose device.  So the rabbit hole stops here, but I had no idea of what available {cmd}‘s I had were.  A quick thing I remember from some time ago combined with grep gets me what I want.  Alright, alright, alright!

Knowing I have zero SSD SATA/SAS/PCIe connected, I did the inevitable.  I checked to see what SSD disks were attached to my hypervisor.  Can you guess, like myself, that the answer is zero?  VMware doesn’t even care about responding with “You don’t have any SSD disks attached.”  Just an empty response.  I’m cool with that.

So this is where I’ll leave it for now.  I’ll attach an SSD disk and continue this article soon.

Remote WMI on Windows Server 2008 R2

Configure DCOM

  • On the server to be managed click Start, click Run, type DCOMCNFG, and then click OK.
  • In the Component Services dialog box, expand Component Services, expand Computers, and then right-click My Computer and click Properties.
  • In the My Computer Properties dialog box, click the COM Security tab.
  • Under Launch and Activation Permissions, click Edit Limits.
  • In the Launch Permission dialog box, select ‘Distributed COM Users’. In the Allow column under Permissions for User, select Remote Launch and select Remote Activation, and then click OK.
  • Under Access Permissions, click Edit Limits.
  • In the Access Permission dialog box, select ‘Distributed COM Users’. In the Allow column under Permissions for User, select Remote Access, and then click OK.
  • Add the user account to the Distributed COM Users Group in Computer Management, Local Users and Groups on the Server to be managed.
  • Add the user account to the Performance Log Users Group in Computer Management, Local Users and Groups on the Server to be managed.

Configure WMI

  • On the server to be managed click Start, click Run, type wmimgmt.msc, and then click OK.
  • In the console tree, right-click WMI Control, and then click Properties.
  • Click the Security tab.
  • Select the Root namespace and then click Security.
  • In the Security dialog box, click Add.
  • In the Select Users, Computers, or Groups dialog box, enter the user account. Click the Check Names button to verify your entry and then click OK.
  • In the Security dialog box, under Permissions, select ‘Enable Account’ and ‘Remote Enable’ for the user account.
  • Ensure the permissions propagate to all subnamespaces.