This is how I create various Windows VM templates in Hyper-V.
Create a new Hyper-V Virtual Machine
Choose the generation of the virtual machine to create
Assign it 2 CPU and 4GB RAM, uncheck Use Dynamic Memory
Choose where to store the virtual disk and the disk size
Install Windows on the virtual machine
After installation, perform updates or any software installation needed as a standard deployment
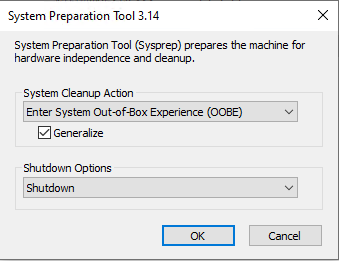
Run C:\Windows\System32\SysPrep\sysprep.exe on the newly created virtual machine
Check the box to Generalize as Out-of-Box Experience is necessary

Select the Shutdown option in the shutdown options
Once the virtual machine is shut down, right click and select Export…
Choose the location to export the virtual machine to, for example, C:\Hyper-V\Templates
The template is created at this point. The main virtual machine created can be deleted, or retained as a master image that updates can be performed against and then sysprep’d afterward to create updated templates.
To import the template as a new virtual machine, right click on the Hyper-V server and select Import Virtual Machine…
Select Copy the Virtual Machine (create a new unique ID)
Choose the location to import the virtual machine into; default location can be used or a custom location for each Configuration, Checkpoint and Paging folder
Once the import operation is completed, rename the virtual machine to something that better suits the server or what the server name will be. Once this is completed, navigate to the folder selected for the operation to copy the VHD to (commonly the default location of all VHD files on Hyper-V) and rename the VHD. During the import service Hyper-V makes (essentially) an exact replica of the template to include file names for disks.
Rename this copied disk to match the server name. If you attempt to use the template again and do not rename the disk, the operation will fail due to a file with the template disk name already existing.
Edit the virtual machine after renaming and remap the VHD location to the newly renamed.
Power on the virtual machine