List VMFS extents in ESXi

Run the esxcli storage vmfs extent list command to generate a list of extents for each volume and mapping from device name to UUID.
You see output similar to:

Volume Name VMFS UUID Extent Number Device Name Partition
------------ ----------------------------------- ------------- ------------------------------------ ---------
esxi-local 4e0d86e1-0db6f826-6991-d8d3855ff8d6 0 mpx.vmhba2:C0:T0:L0 3
datastore1 4d4ac840-c1386fa0-9f6d-0050569300a7 0naa.6006016094602800364ce22e3825e011 1
vmfs5 4dad8f16-911648ca-d660-d8d38563e658 0naa.600601609460280052eb8621b73ae011 1

This host has no isolation addresses defined as required by vSphere HA

Had some troubles with an ESXi 5.5 host the past week and rebuilt some of the networking which included removing a vmkernel and re-adding to a standard vSwitch and then setting up VMotion and Management tags on it.
Came across the following error on my host in vSphere Client:
2016-05-13_135825
To resolve this issue, I needed to make sure that there is a default gateway on the port group that the VMotion vmkernel is on.
Click on the ESXi Host then navigate to Configuration > Networking and on the VMkernel Port that I’m using for VMotion, click Properties…
2016-05-13_135657
Next, I examine properties of the VMotion VMkernel.
2016-05-13_135706
Looking at the IP Settings tab, I see there is no VMkernel Default Gateway defined, so I clicked Edit…
2016-05-13_135712
I entered in my default gateway and clicked OK and then OK again to exit the switch properties dialog.
2016-05-13_135718
Finally, I right-click on the ESXi host and click Reconfigure for vSphere HA
2016-05-13_135743
At this point, no additional errors are reported for my ESXi host.  =)

Monitor ESXi Free using SNMP

ESXi 4.1 and 5.0 Enable SNMP

SSH to host and edit the SNMP.XML file:

vi /etc/vmware/snmp.xml

Make the following changes:

<config>
<snmpSettings>
<enable>true</enable>
<communities>public</communities>
<targets>192.168.1.100@public</targets>
</snmpSettings>
</config>

Restart management agents with the following command:

/etc/init.d/hostd restart

On ESXi 5.1 and 5.5 enable SNMP

SSH to host and run the following command:

esxcli system snmp set --communities=public --enable=yes --targets=192.168.1.100/public

Test SNMP trap

vicfg-snmp --server <ESXiServerIP> --username root --password <Password> --test

Reviewing the SNMP configuration

When I look at my SNMP configuration using vCLI (once again, this is a read operation so I can use vCLI), I see the following.

vi-admin@vma:~> vicfg-snmp --server <ESXiServerIP> --username root --password <Password> -s
Current SNMP agent settings:
Enabled : 1
UDP port : 161
Communities :
public
Notification targets :
192.168.1.100@162/public
Options :
EnvEventSource=indications

Create a Hyper-V Template for a Windows VM

This is how I create various Windows VM templates in Hyper-V.

Create a new Hyper-V Virtual Machine

Choose the generation of the virtual machine to create

Assign it 2 CPU and 4GB RAM, uncheck Use Dynamic Memory

Choose where to store the virtual disk and the disk size

Install Windows on the virtual machine

After installation, perform updates or any software installation needed as a standard deployment

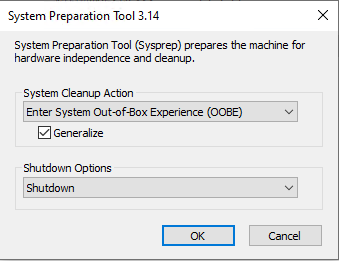
Run C:\Windows\System32\SysPrep\sysprep.exe on the newly created virtual machine

Check the box to Generalize as Out-of-Box Experience is necessary

Select the Shutdown option in the shutdown options

Once the virtual machine is shut down, right click and select Export…

Choose the location to export the virtual machine to, for example, C:\Hyper-V\Templates

The template is created at this point. The main virtual machine created can be deleted, or retained as a master image that updates can be performed against and then sysprep’d afterward to create updated templates.

To import the template as a new virtual machine, right click on the Hyper-V server and select Import Virtual Machine…

Select Copy the Virtual Machine (create a new unique ID)

Choose the location to import the virtual machine into; default location can be used or a custom location for each Configuration, Checkpoint and Paging folder

Once the import operation is completed, rename the virtual machine to something that better suits the server or what the server name will be. Once this is completed, navigate to the folder selected for the operation to copy the VHD to (commonly the default location of all VHD files on Hyper-V) and rename the VHD. During the import service Hyper-V makes (essentially) an exact replica of the template to include file names for disks.

Rename this copied disk to match the server name. If you attempt to use the template again and do not rename the disk, the operation will fail due to a file with the template disk name already existing.

Edit the virtual machine after renaming and remap the VHD location to the newly renamed.

Power on the virtual machine

Shrink VMDK

First open up Disk Management in Computer Management in your guest Windows environment.

Right click the volume on the disk you want to shrink.

Windows will inform you the maximum amount it can shrink the disk by. Choose an amount that you wish to actually shrink it by and click Shrink.

Windows will start the shrinking process and it might take some time and appear to be hanging as Windows will actually be defragmenting the disk in order to consolidate the free space towards the end of the disk before resizing the volume.

Once it is done and you are satisfied that the volume on the disk is the size you want it then you need to shut down the VM.

SSH into the host and copy the VMDK file to make a backup of it, just the descriptor file not the flat file.

cp vmname.vmdk vmname-original.vmdk

Open up the VMDK file in a text editor and find the line that describes the size of the flat file. Similar to the following

# Extent description

RW 209715200 VMFS “vmname-flat.vmdk”

The number is the size of the virtual disk in terms of disk sectors, where each sector is 512 bytes. So a 100GB virtual disk is 209715200 sectors.

You will need to change this number to correspond to the new disk size where x = size in GB

vmdk_size = [x * (1024*1024*1024)] / 512

I have chosen to shrink my disk to 60gb, so my new Extent description now reads as follows:

# Extent description

RW 125829120 VMFS “vmname-flat.vmdk”

You now need to clone the drive to get it to the new size:

vmkfstools -i vmname.vmdk vmname-new.vmdk

The bit we are interested in is the newly created vmname-new-flat.vmdk file.

Rename the old flat file from vmname-flat.vmdk to vmname-flat-old.vmdk

and rename the vmname-new-flat.vmdk file to vmname-flat.vmdk

Start the VM up and it should show the new smaller disk. When you are satisfied that everything is working you can now delete the old unneeded files from your datastore.