Proxmox Nested VM – Enable MAC spoofing Hyper-V

Windows 11 > Windows Hyper-V > Proxmox VE 7.2 > Debian 11.2 VM

In order for my Debian VM to be able to access the DHCP/network resources provided by devices on the outside of my Hyper-V server, I needed to enable Forged Transmits (MAC spoof) on my Proxmox VE 7.2 Hyper-V VM.

Now I can continue with my Debian VM installation with DHCP (netinstall).

Enable nested virtualization for VM in Hyper-V

Nested virtualization is available on Windows 10 build 19636 and later. As far as I understand, AMD support will be officially available as part of Windows 11 and Windows Server 2022. Both products are expected in the second half of 2021.

Enable Nested Virtualization

Get the virtual machine intending to enable nested virtualization on using Powershell.

get-vm

Now with the name of the VM, enable nested virtualization.

Set-VMProcessor -VMName 'Windows 11' -ExposeVirtualizationExtensions $True

Confirm Nested Virtualization is Enabled

To confirm nested virtualization is enabled for the VM, or any VM, use the following Powershell command.

(Get-VM 'proxmox ve 7.2' | Get-VMProcessor ).ExposeVirtualizationExtensions

Sysprep Windows Server 2016 for Virtualization

Finally getting around to installing Windows Server 2016 (Standard, Desktop Experience) to use for application testing and upgrade plans this year.  I haven’t tested this release since Technical Preview 5 which had introduced the Nano edition.

I plan to create a sysprep image of the virtual machine so I can quickly deploy the system in the future.
What is sysprep?

The System Preparation (Sysprep) tool prepares an installation of Windows for duplication, auditing, and customer delivery. Duplication, also called imaging, enables you to capture a customized Windows image that you can reuse throughout an organization. Audit mode enables you to add additional device drivers or applications to a Windows installation. After you install the additional drivers and applications, you can test the integrity of the Windows installation. Sysprep also enables you to prepare an image to be delivered to a customer. When the customer boots Windows, Windows Welcome starts.

Since Windows 8 and Server 2012, there is a new command line switch for sysprep, /mode:vm.
Note:  This switch is only supported for virtual machines.  You can’t mix and match Hyper-V VMs and VMWare VMs.  Also, you cannot deploy this image to physical machine.

Install Windows Server 2016

First thing’s first, I’m going to install Windows Server 2016 Standard Desktop Experience.
Minimum System Requirements for Windows Server 2016 Standard (Desktop Experience):

  • 1.4 GHz 64-bit EMT64 or AMD64 processor
  • Support for security features like NX Bit and DEP (Data Execution Prevention)
  • The processor should support CMPXCHG16b, LAHF/SAHF, and PrefetchWNeeds
  • Needs to Support EPT or NPT (Second Level Address Translation)
  • 32GB disk space for Core, 4GB additional for GUI (Desktop Experience)
  • Needs to be a PCI Express Compliant Disk Controller.
  • ATA/PATA/IDE/EIDE are not supported for either boot, page, or data.

For my base system, I’m using a 50GB disk, 4GB RAM, and 1 socket, 2 core 2GHz vCPU.

Now that the base operating system is installed, I will do a few maintenance tasks that I like to do to my systems.

  • Windows Updates
  • Change Performance to High Performance

Once that is done, I can sysprep.

Sysprep the Windows Server VM

As noted above, the new flag (since Windows 8/Server 2012) /mode:vm allows for faster deployment, but you can’t switch between hypervisors after it is made and it cannot be deployed to physical hardware.  Once the sysprep is completed, the resulting VHD can be copied and attached to a new VM quickly.

c:\windows\system32\sysprep\sysprep.exe /oobe /generalize /shutdown /mode:vm

It will shutdown after sysprep completes, and at this point I can now simply clone the virtual machine to a new virtual machine.

After sysprep completes, I Clone the virtual machine in VMWare.  Once cloned, I power the virtual machine on and fill in the information at first startup as shown in the screenshots below.

Create a Hyper-V Template for a Windows VM

This is how I create various Windows VM templates in Hyper-V.

Create a new Hyper-V Virtual Machine

Choose the generation of the virtual machine to create

Assign it 2 CPU and 4GB RAM, uncheck Use Dynamic Memory

Choose where to store the virtual disk and the disk size

Install Windows on the virtual machine

After installation, perform updates or any software installation needed as a standard deployment

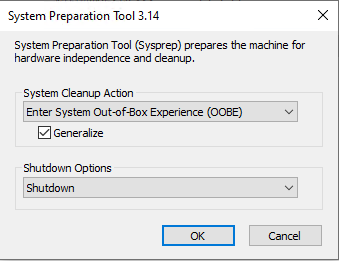
Run C:\Windows\System32\SysPrep\sysprep.exe on the newly created virtual machine

Check the box to Generalize as Out-of-Box Experience is necessary

Select the Shutdown option in the shutdown options

Once the virtual machine is shut down, right click and select Export…

Choose the location to export the virtual machine to, for example, C:\Hyper-V\Templates

The template is created at this point. The main virtual machine created can be deleted, or retained as a master image that updates can be performed against and then sysprep’d afterward to create updated templates.

To import the template as a new virtual machine, right click on the Hyper-V server and select Import Virtual Machine…

Select Copy the Virtual Machine (create a new unique ID)

Choose the location to import the virtual machine into; default location can be used or a custom location for each Configuration, Checkpoint and Paging folder

Once the import operation is completed, rename the virtual machine to something that better suits the server or what the server name will be. Once this is completed, navigate to the folder selected for the operation to copy the VHD to (commonly the default location of all VHD files on Hyper-V) and rename the VHD. During the import service Hyper-V makes (essentially) an exact replica of the template to include file names for disks.

Rename this copied disk to match the server name. If you attempt to use the template again and do not rename the disk, the operation will fail due to a file with the template disk name already existing.

Edit the virtual machine after renaming and remap the VHD location to the newly renamed.

Power on the virtual machine

Hyper-V: Error applying Virtual Switch Properties changes

I got the following error when attempting to create a Virtual Switch in Hyper-V on Windows 8.1.

2014-06-02_153048
Error applying Virtual Switch Properties changes

I resolved this by removing Oracle VirtualBox.  Some how this was causing the issue.  I’ll research it at a later date to get a specific reason for the failure.